
Welcome to my stop on the Cloud9 Block Design Blog Hop. This is day 3 of the hop, but in case you haven’t been following the action so far let me tell you all about it!
As a continuation of our New Bloggers Group, we were offered the opportunity to participate in this block design blog hop. Cloud9 Fabrics generously gave each participant a bundle of their lovely fabric, and in exchange we agreed to design a block and write a tutorial on how to make it. Cheryl at Meadow Mist Designs will then take all of our blocks and put them together into a quilt for charity. What a great opportunity! There is a long list of bloggers involved in the hop – you can see the whole schedule and list of participants at the end of this post. Thanks so much to Cloud9 for sponsoring this hop, and to Yvonne (Quilting Jet Girl), Cheryl (Meadow Mist Designs) and Stephanie (Late Night Quilter) for hosting it!
I was pretty excited when my bundle arrived:
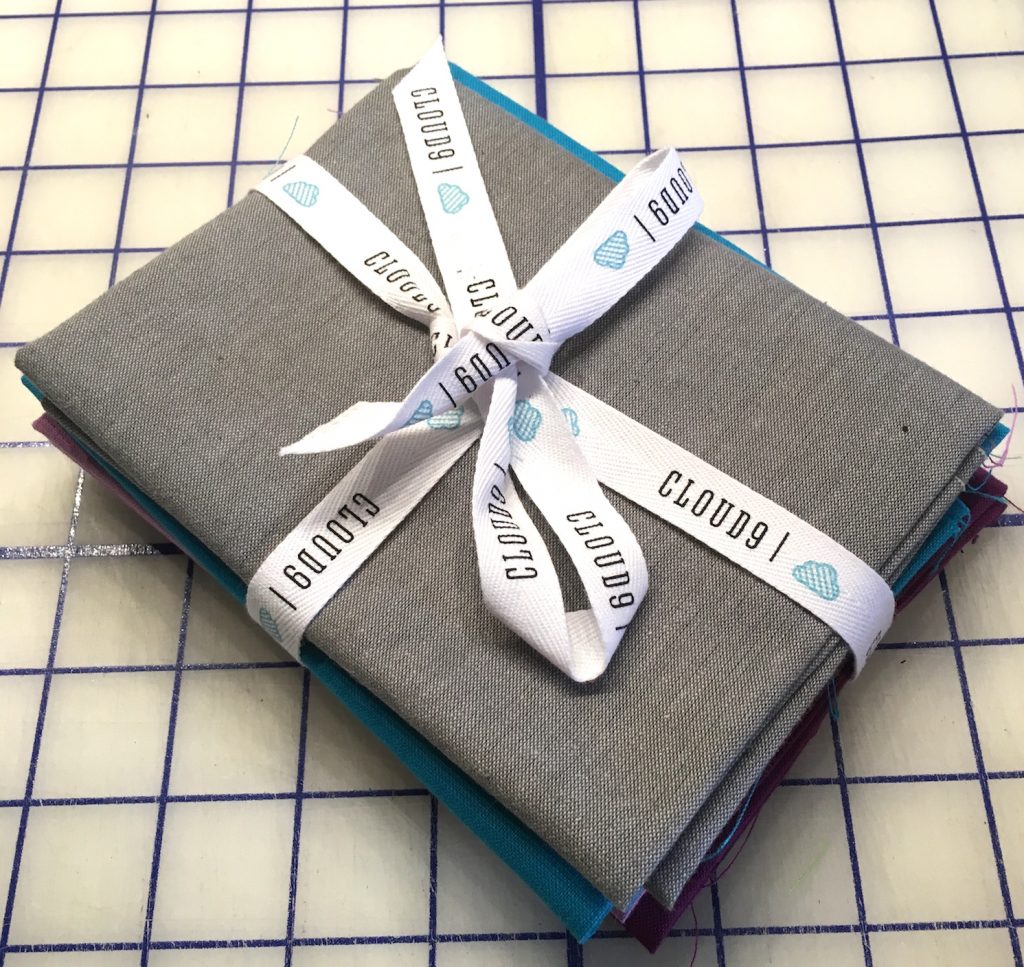
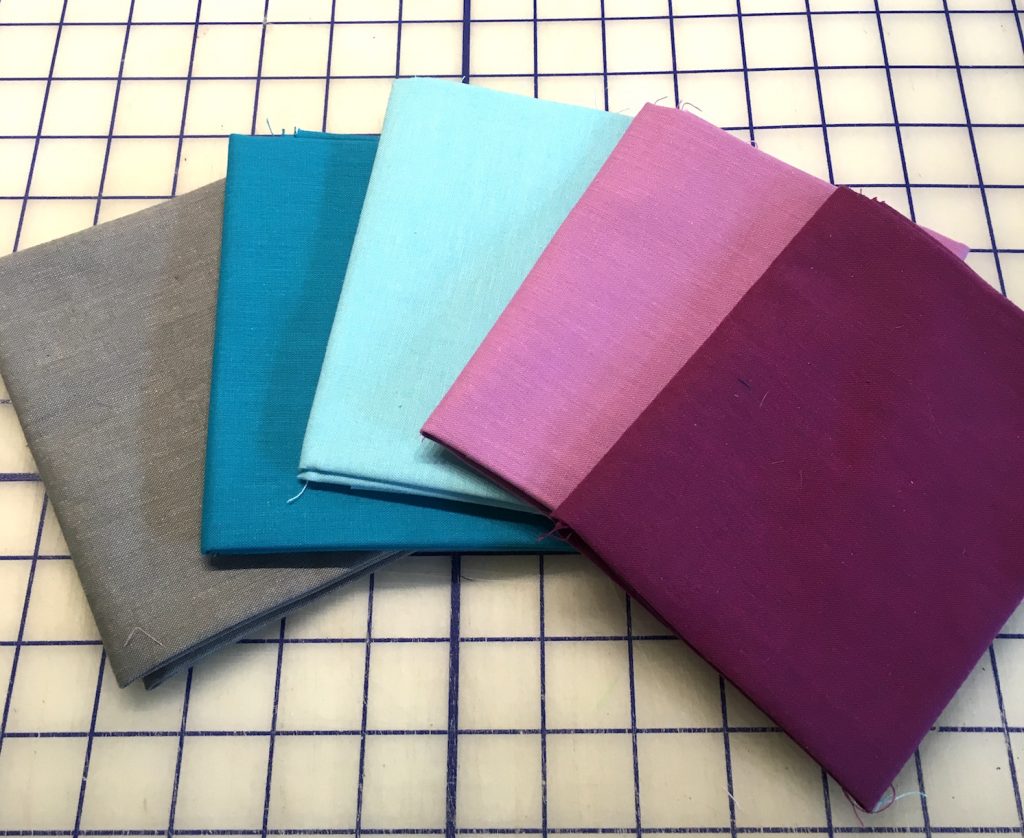
Here is the fabric – it is really pretty, and really nice to work with.
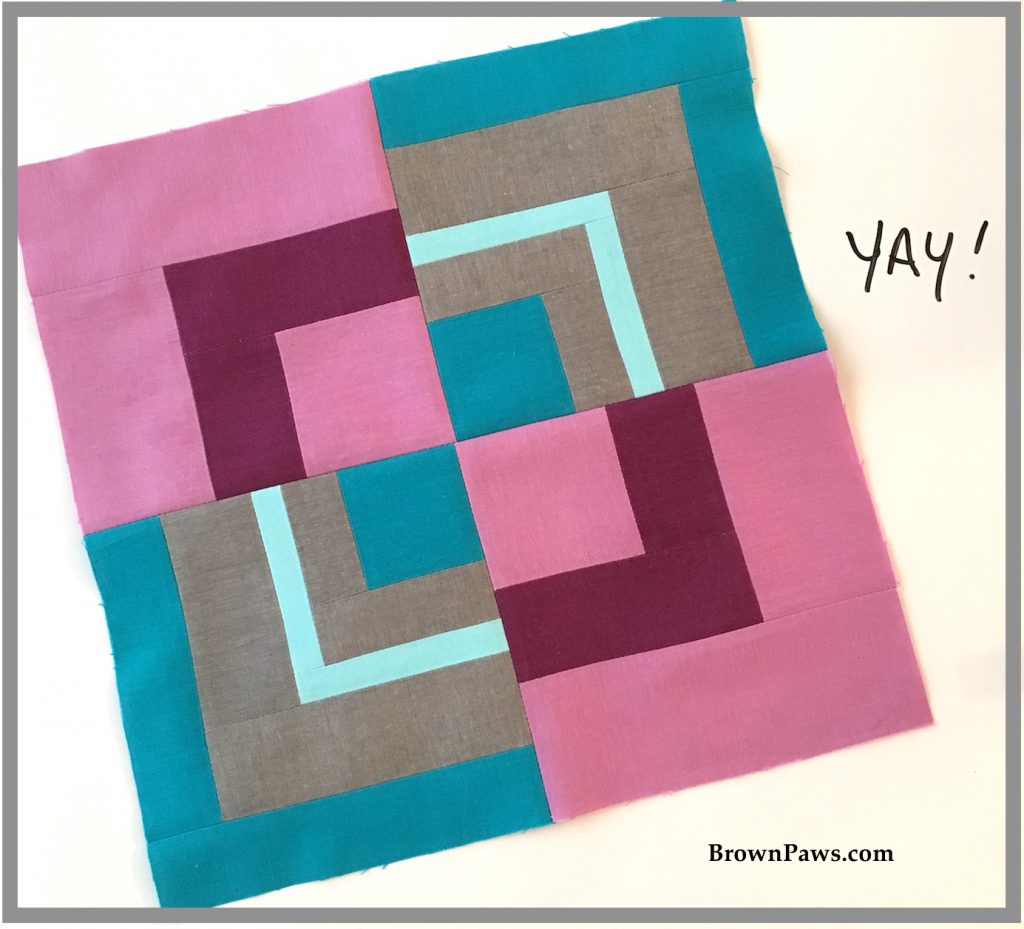
This is my block – I’m calling it Abstract Cabin. It is a take on a Log Cabin block, but with more of a non-traditional, abstract feel. All of the colors are so rich and beautiful that I really wanted to be able to off all of them.
So let’s get started! Let’s cut into this stack.
Some General Notes:
- The block finishes at 12″, or 12.5″ unfinished
- I am assuming 1/4″ seam allowances throughout
- For fabric quantity, I used the bundle of fat quarters that were sent to us. However you don’t need the full fat quarter of any of the colors. If you cut carefully, you could probably do this with some larger scraps.
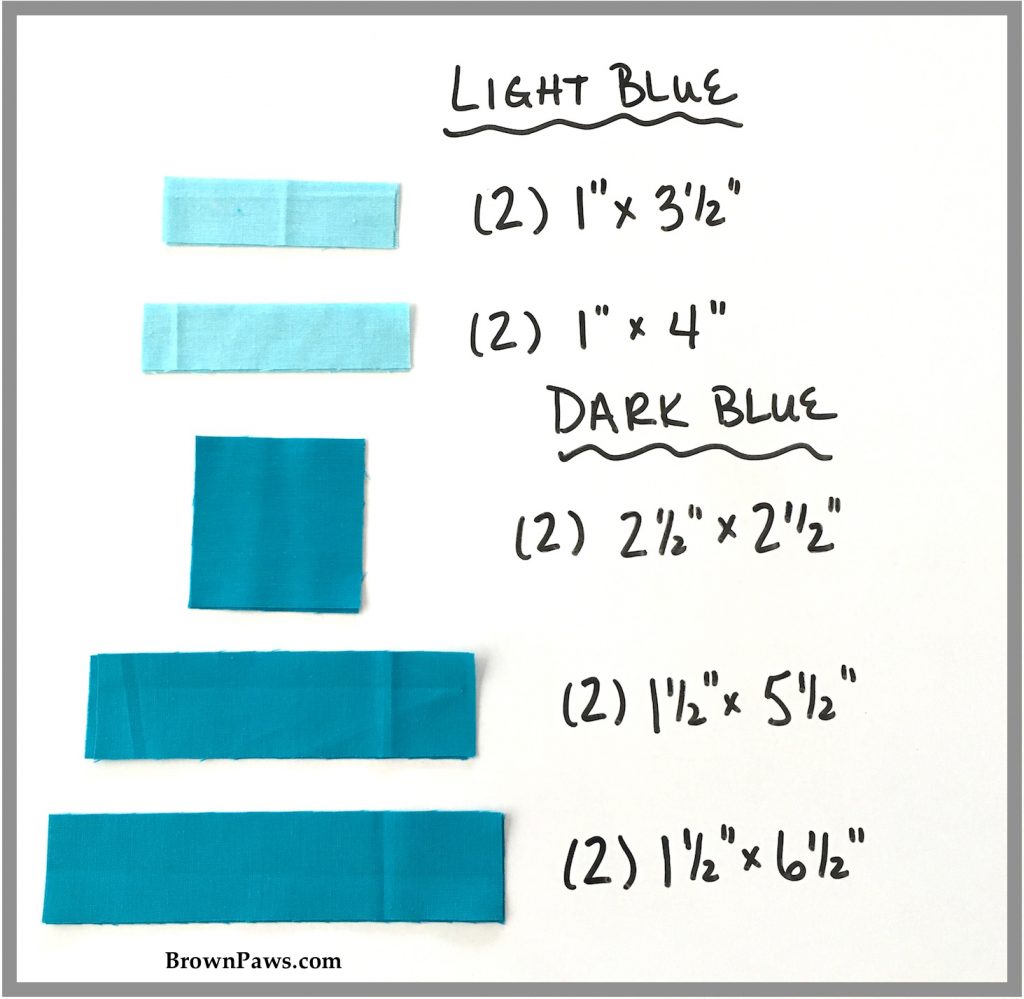
First the blue:
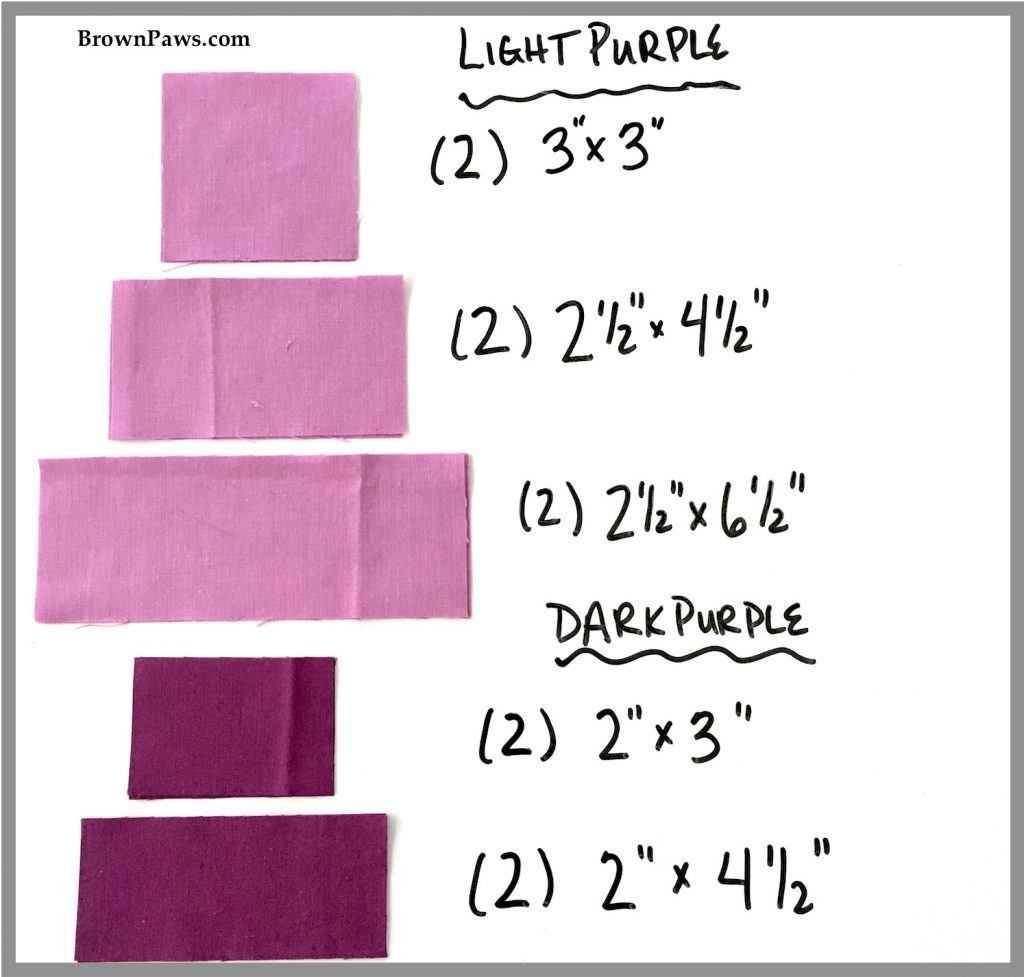
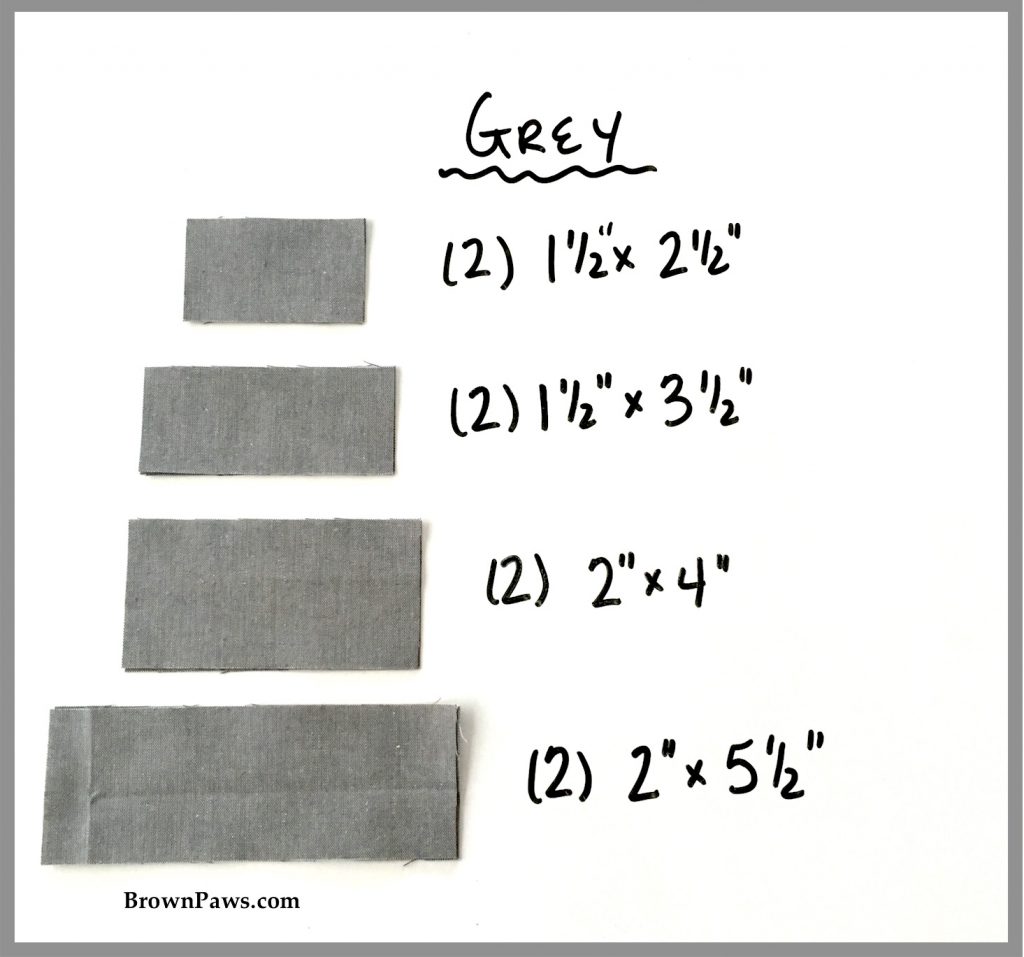
The photo shows the size to cut, and the number of pieces to cut of that size in (). For example, the first section below says to cut two (2) 1″ x 3 1/2″ and two (2) 1″ x 4″ rectangles from the light blue fabric.
Next the Purple:
and the Grey:
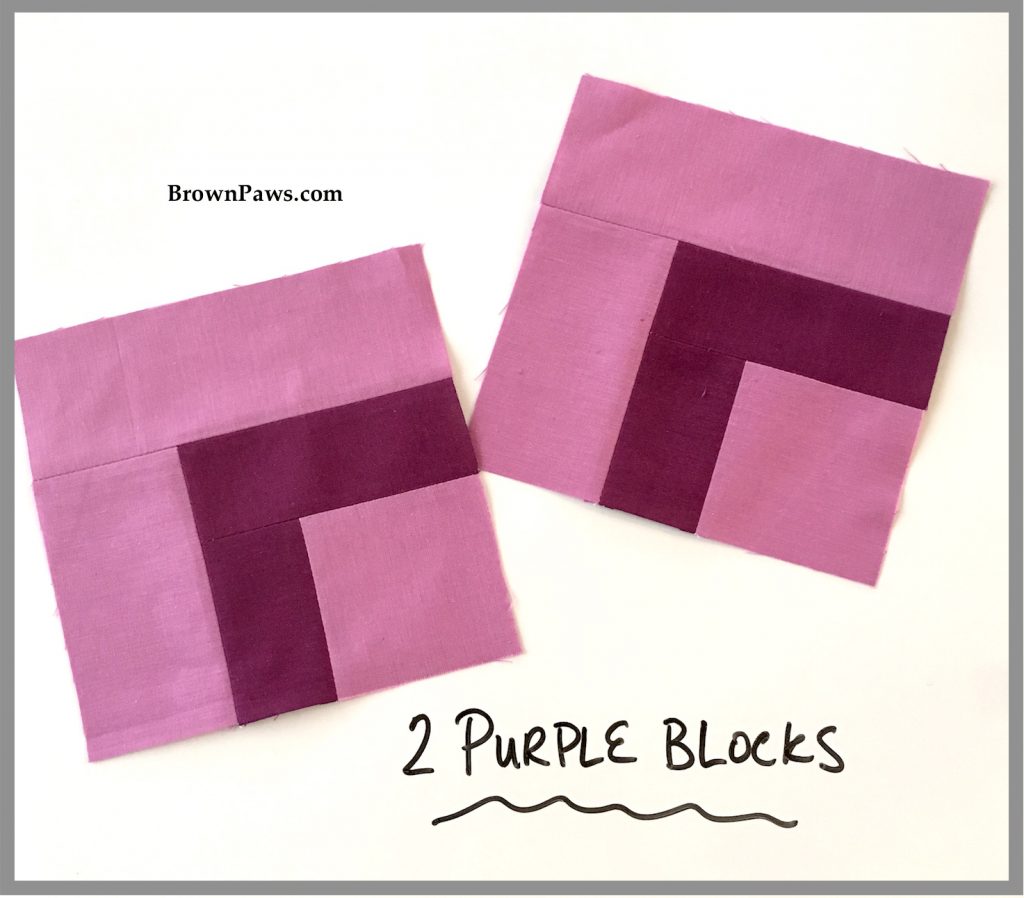
Next let’s start on the Purple blocks.
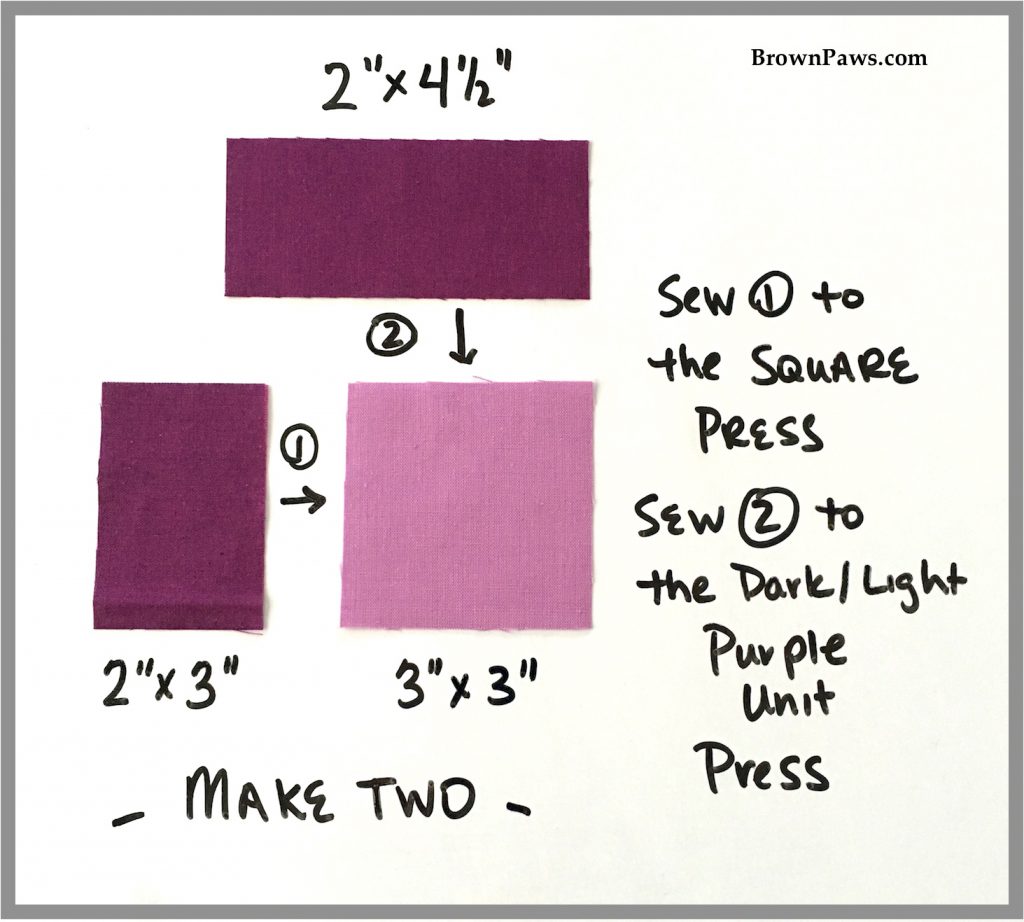
Step 1 Purple:
Sew one dark purple 2″ x 3″ rectangle to the left of the light purple 3″ square. Press the seam – open or to the side – whatever you prefer. Sew a dark purple 2″ x 4 1/2″ rectangle to the top of the first unit and press the seam. Make two of these units.
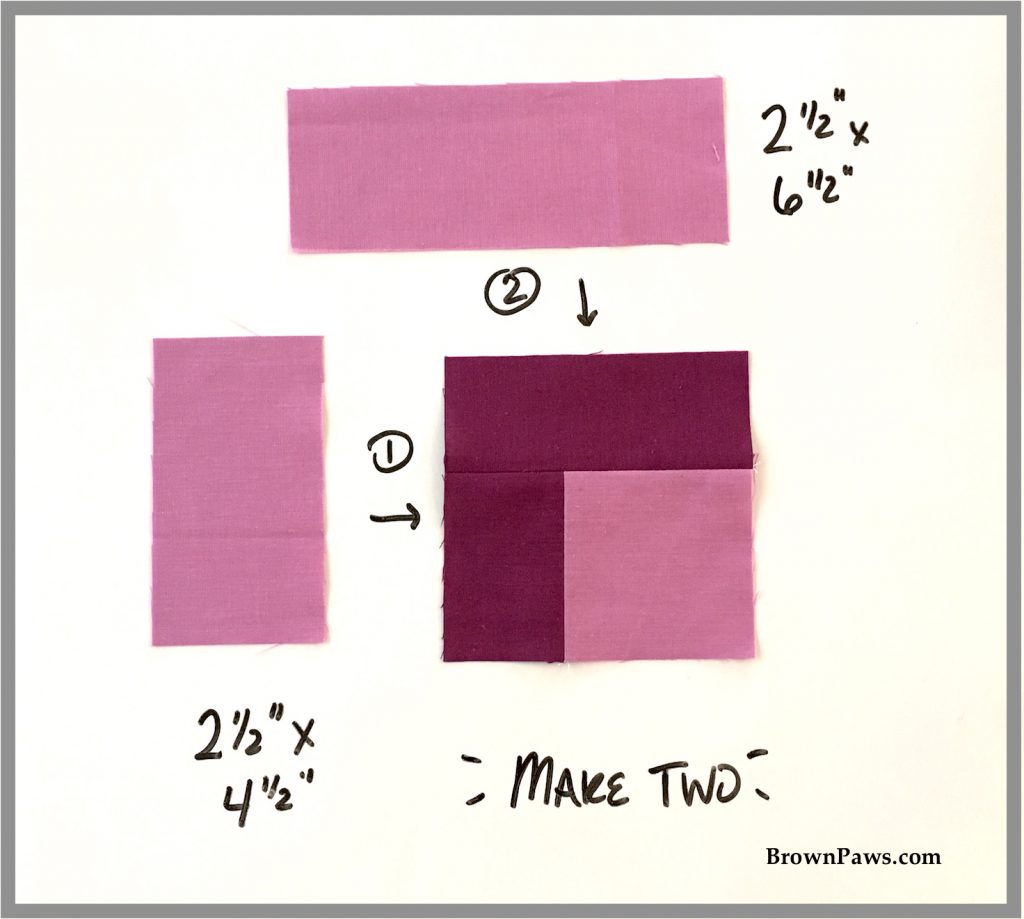
Step 2 Purple:
Sew one light purple 2 1/2″ x 4 1/2″ rectangle to the left of the block – see block orientation of the block below. Press the seam. Sew a light purple 2 1/2″ x 6 1/2″ rectangle to the top of the first unit and press the seam. Repeat both steps on the second block unit.
Step 3 Purple:
That’s it for the purple sub-blocks – aren’t they cute!?!?
The Blue blocks are a bit more involved than the Purple blocks – not harder, but there are more logs to add to the block to get it built up.
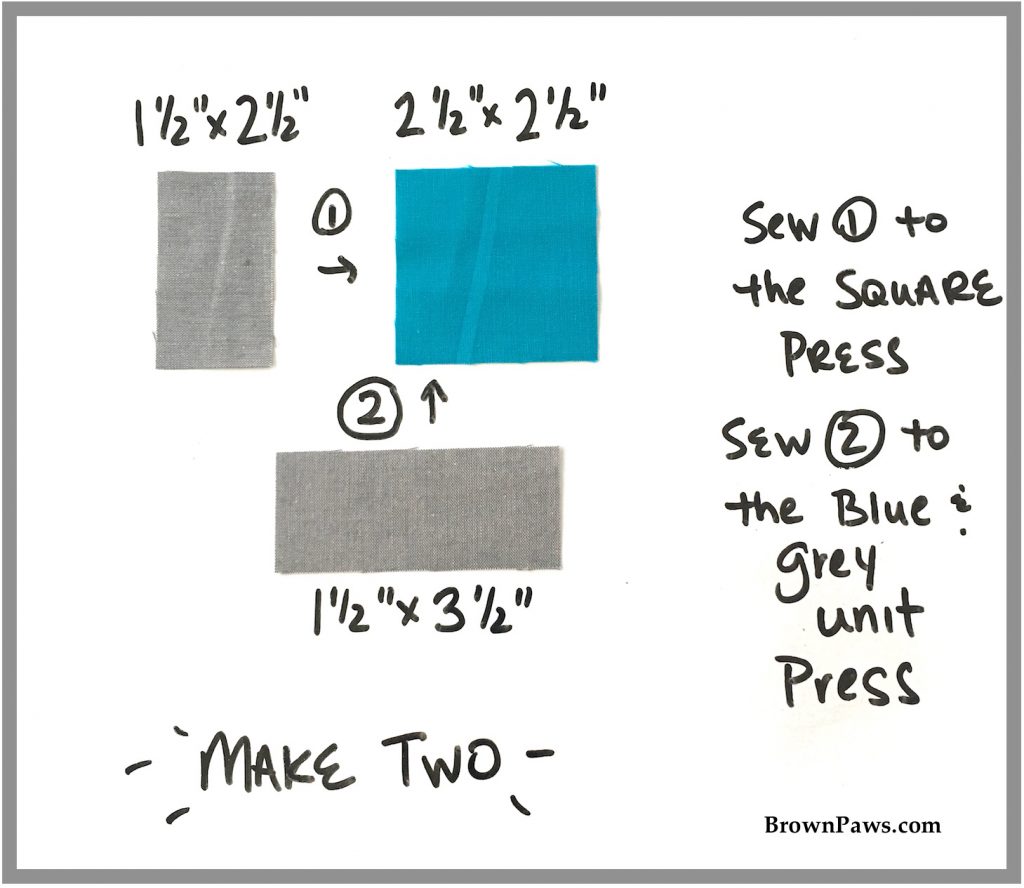
Step 1 Blue:
Sew one grey 1 1/2″ x 2 1/2″ rectangle to the left of the light blue 2 1/2″ square. Press the seam. Sew a grey 1 1/2″ x 3 1/2″ rectangle to the bottom of the first unit and press the seam. Make two of these units.
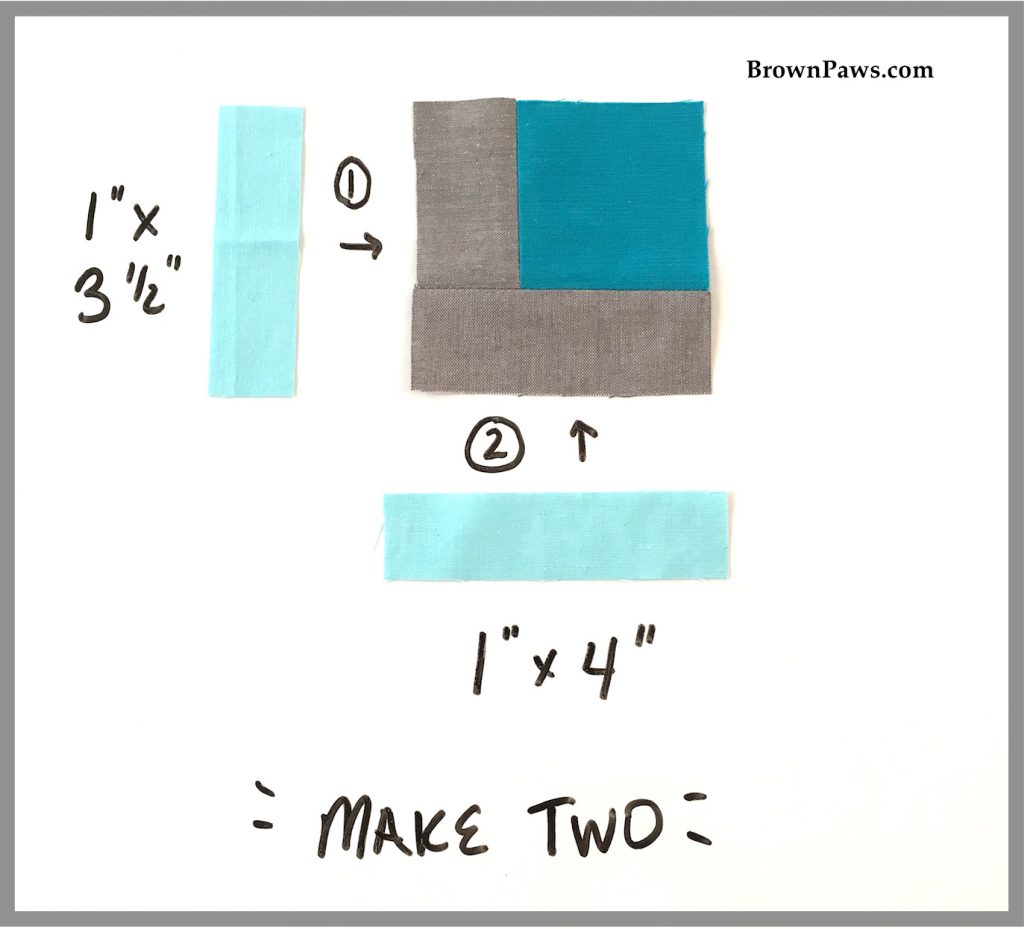
Step 2 Blue:
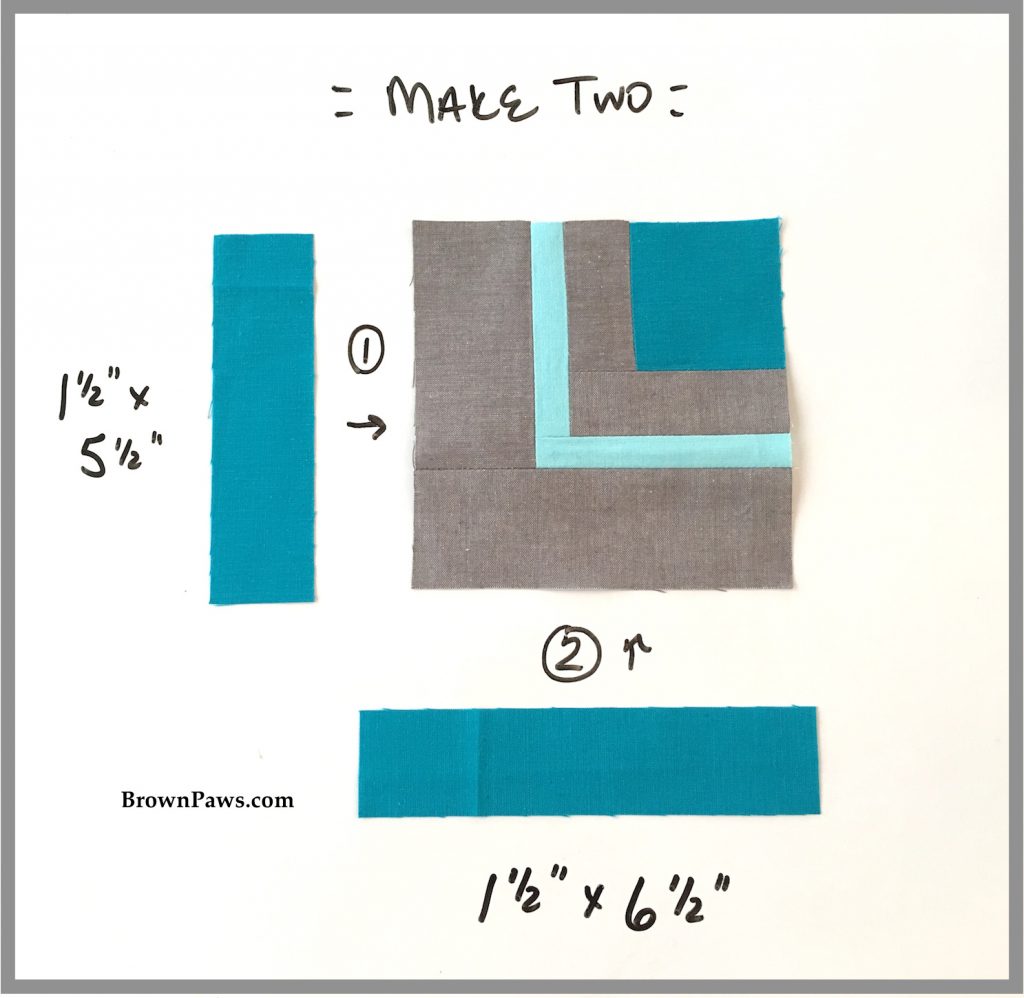
Sew one light blue 1″ x 3 1/2″ rectangle to the left of the block (see block orientation below in the photo). Press the seam. Sew a light blue 1″ x 4″ rectangle to the bottom of the first unit and press the seam. Repeat both steps on the second block unit.
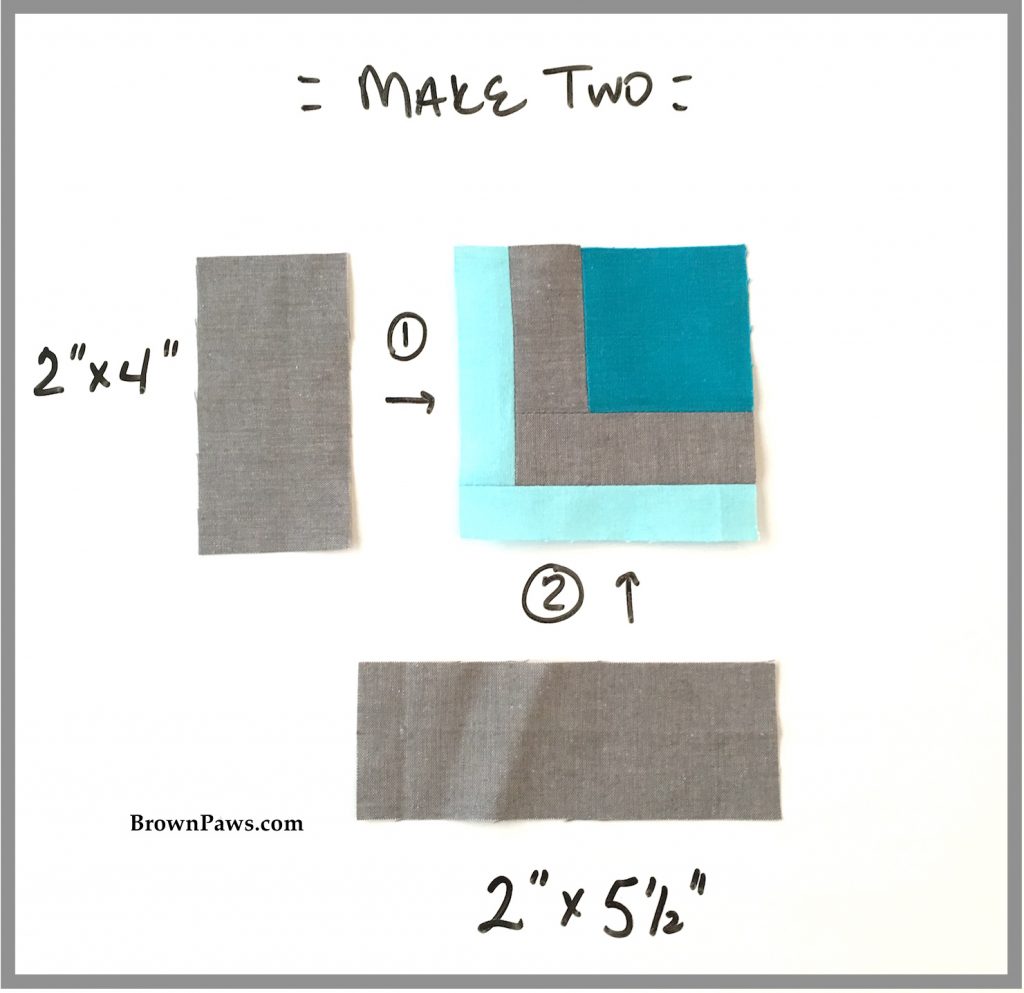
Step 3 Blue:
Sew one grey 2″ x 4″ rectangle to the left of the block (see block orientation below in the photo). Press the seam. Sew a grey 2″ x 5 1/2″ rectangle to the bottom of the first unit and press the seam. Repeat both steps on the second block unit.
Step 4 Blue:
Sew one dark blue 1 1/2″ x 5 1/2″ rectangle to the left of the block (see block orientation below in the photo). Press the seam. Sew a dark blue 1 1/2″ x 6 1/2″ rectangle to the bottom of the first unit and press the seam. Repeat both steps on the second block unit.
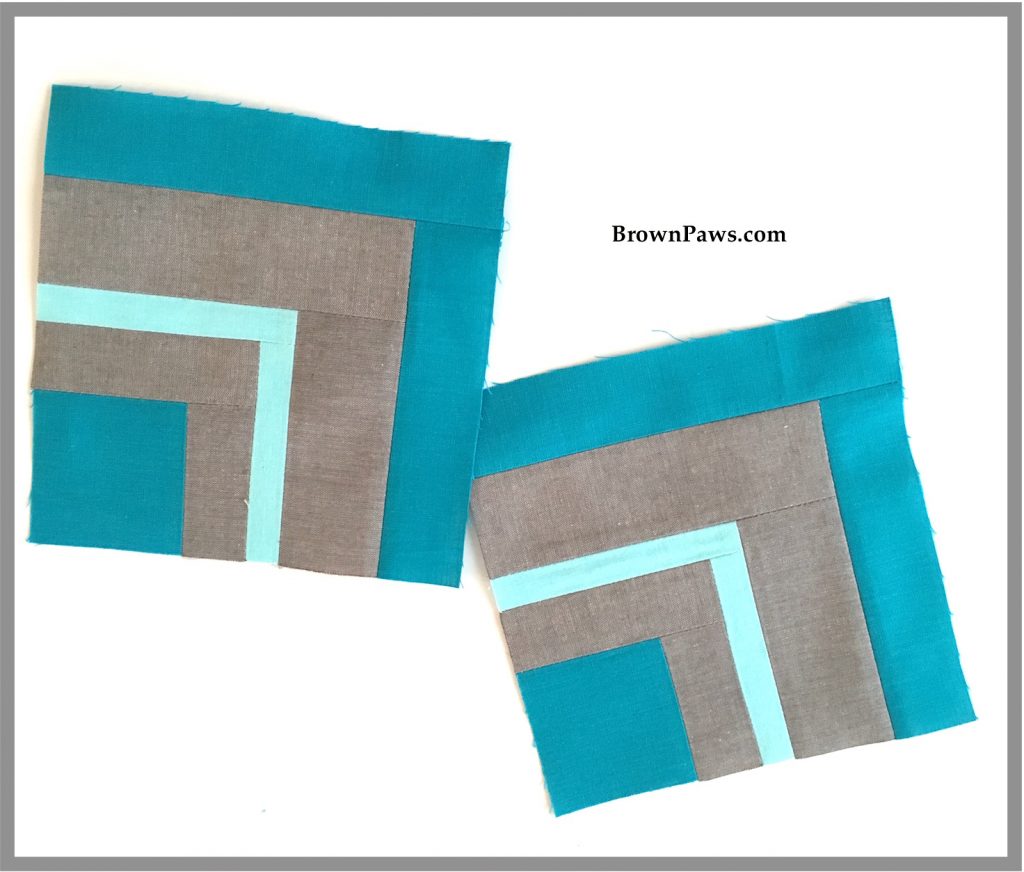
Step 5 Blue:
That’s it for the blue sub-blocks – aren’t they even cuter!?!?
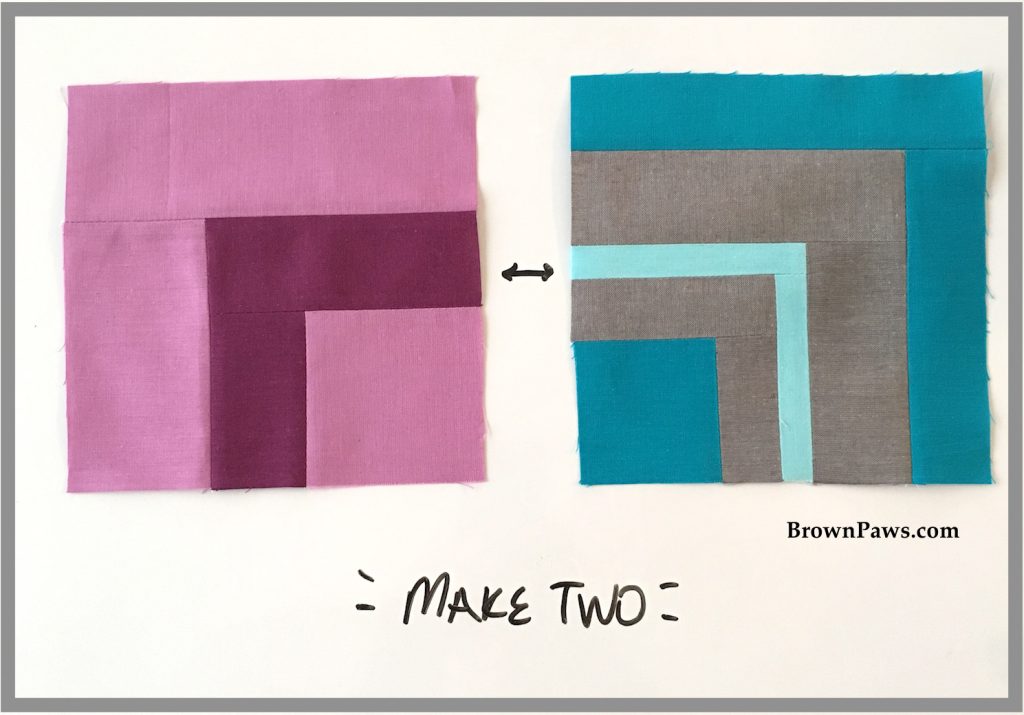
Join the purple and blue sub-blocks as shown – make two of these units.
Join the two halves of the block together.
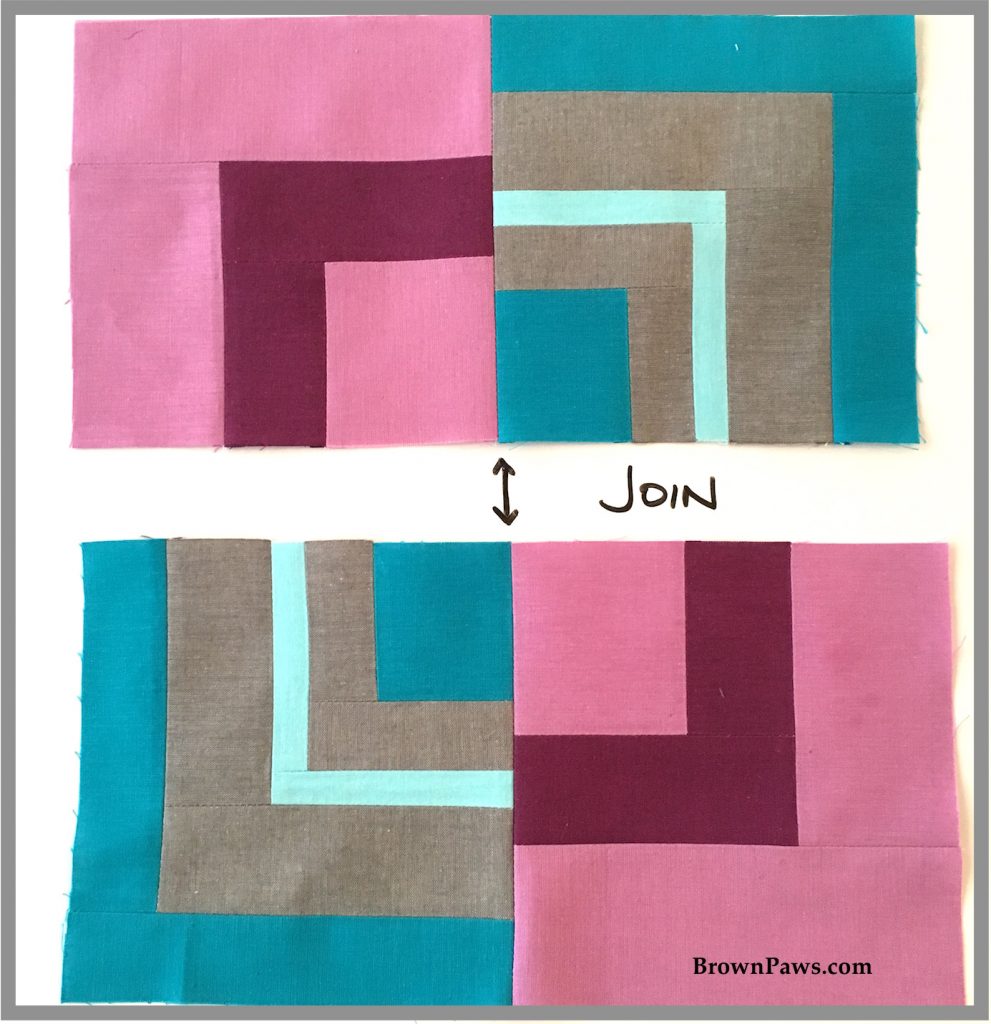
And that’s it! Cool Abstract finished block. I hope you like it!
I had a good time designing the block, so I actually designed another one. I also had enough of my bundle left to both send in this block to Cheryl for the group quilt and make more blocks for this mini quilt:
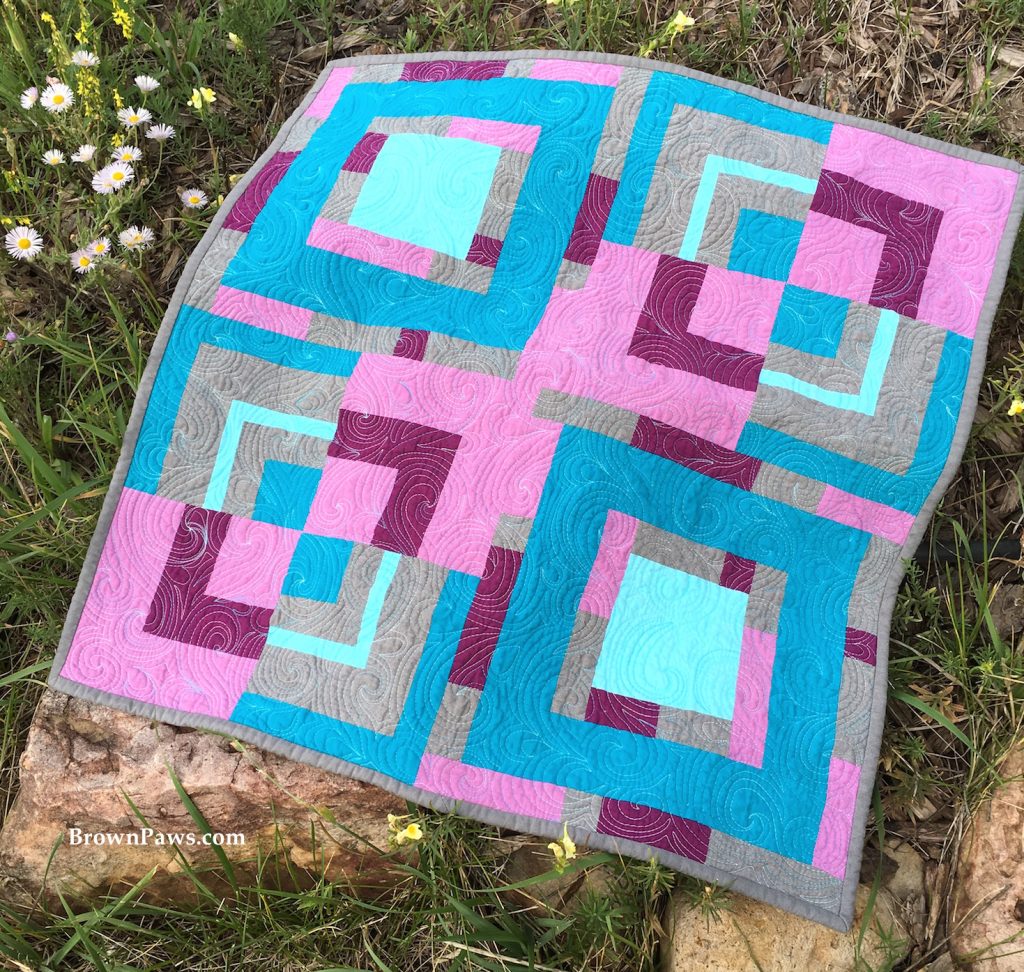
I’ll share a tutorial tomorrow on making the second block, which I’m calling ‘Strippy Squares’. Come on back tomorrow to learn about it!
Here is the list for the blog hop stops – lots of really cool blocks to go check out.
Today’s Stops: Wednesday, September 14th
Host: Stephanie @Late Night Quilter
Kathy @Kathys Kwilts and More
Paige @Quilted Blooms
Mary @Strip Quilts Pass it On
Allison @Woodberry Way
Seven @The Concerned Craft
Olusola @Alice Samuel’s Quilt Co.
Ann @Brown Paws Quilting – THAT’S ME!!!
Jodie @Persimmon + Pear
Vicki @Orchid Owl Quilts
Kitty @Night Quilter
Francine @Mochawildchild
Shelley @The Carpenter’s Daughter who Quilts
Jayne @Twiggy and Opal
Geraldine @Living Water Quilter
Shannon @Shannon Fraser Designs
Lisa @Sunlight In Winter Quilts
Jessica @Quilty Habit
Cassandra @The (not so) Dramatic Life
Deanna @Stitches Quilting
Denise @Craft Traditions
Monday, September 12th
Host: Yvonne @Quilting Jetgirl
Abigail @Cut & Alter
Janice @Color, Creating, and Quilting!
Lorinda @Laurel, Poppy, and Pine
Melva @Melva Loves Scraps
Renee @Quilts of a Feather
Kathryn @Upitis Quilts
Kim @Leland Ave Studios
Amanda @this mom quilts
Holly @Lighthouse Lane Designs
Irene @Patchwork and Pastry
Jennifer @Dizzy Quilter
Karen @Tu-Na Quilts, Travels, and Eats
Anne @Said With Love
Suzy @Adventurous Applique and Quilting
Sharla @Thistle Thicket Studio
Kathleen @Smiles From Kate
Amanda @Gypsy Moon Quilt Co.
Sarah @Sarah Goer Quilts
Chelsea @Patch the Giraffe
Jinger @Trials of a Newbie Quilter
Anja @Anja Quilts
Daisy @Ants to Sugar
Tuesday, September 13th
Host: Cheryl @Meadow Mist Designs
Miranda @I Have Purple Hair
Jennifer @The Inquiring Quilter
Sarah @123 Quilt
Leanne @Devoted Quilter
Jen @Patterns By Jen
Jennifer @RV Quilting
Amanda @Quiltologie
Sharon @Yellow Cat Quilt Designs
Jen @A Dream and A Stitch
Jen @Faith and Fabric
Carole @Carole Lyles Shaw
Stephanie @Quilt’n Party
Susan @Sevenoaks Street Quilts
Katrin @Now What Puppilalla
Amista @Hilltop Custom Designs
Nicole @Handwrought Quilts
Marla @Penny Lane Quilts
Silvia @A Stranger View
Sarah @Smiles Too Loudly
Carrie @the zen quilter
Mary @Quilting is in My Blood
Velda @GRANNYcanQUILT
Great modern take on a traditional log cabin block. Alternated with your second block it’s lovely combination for a very interesting modern log cabin.
Smiles
Kate
Thanks Kate! I designed them separately, but I was really happy with how nicely they wound up looking together. Thanks for stopping by!
Ann, love you block. And I like your way of presenting the instructions, were they written on a white board? And you even made a quilt! Great job!
Hi Paige, thanks so much! Yes, I wrote the instructions on a whiteboard and took pictures between each step. It was a pretty easy way to go, and fun to do. Thanks for stopping by!
Nicely done! Thanks for the tutorial.
Thanks Peggy! Really appreciate you stopping by my blog today!
I really love wonky squares always. this is no exception – well done! I love your finished product, too. Those fabrics are just fabulous, aren’t they?
Thanks Carrie! Wonky squares are fun, and here they were a fun way to show off lots of colors. The fabrics are fabulous!
Love this abstract block-aren’t the colors amazing! -very nice! Thank you, Susan
Thanks Susan! Really appreciate you stopping by.
I love log cabin blocks! This one has elements of abstract, wonky, traditional…all things I lean towards!
Great, thanks Jayne! I like modern takes on traditional blocks. I hope you give the block a try! If you do, let me know how it goes.
This is a really fun variation of the log cabin, which has always been a favourite of mine! Great, fun tutorial style too 🙂
Thanks Leanne, it has always been a favorite of mine too. Thanks for your comment about my tutorial too – it was fun to make.
I loved your tutorial! It just felt fun and effortless. The block is fun too! I especially love that you made a mini quilt and I will be back to your Strippy Squares block!
Thanks Sarah! It was fun, though not entirely effortless 🙂
Thanks also for coming back tomorrow for Strippy Squares – I hope you like it!
I’m so tickled that you designed a second block and had enough fabric to make a mini quilt using the two designs. That is awesome! Thank you so much for participating in the hop. 🙂
Thanks Yvonne! I couldn’t decide which block to go with so I made them both, then I had some much fabric left over I just made a few more blocks. It was fun, but it was especially fun playing with the machine quilting. I finally worked out a swirl motif I had been trying to nail down for a few months.
Thank you guys so much for all you’ve done, both for the new bloggers group and hop and then this hop. They have been lots of fun and I have really learned so much. Thank you!
Ann, I love your block and the mini quilt you made using the block. They are wonderful! Many thanks!
Thanks Jennifer! I had a great time making them both. Thanks so much for stopping by my blog.
I love your mini quilt and your block is so pretty. Your tutorial is wonderfully clear
Thanks Olusola, appreciate your kind words. This hop was a bunch of fun.
Well done. Your block is great.
Thanks Anja! Really appreciate you stopping by my blog.
Ann, you have made a very fun looking and modern block. =) Congratulations
Thank you! I was going for fun and modern, so yay! 🙂
What a fun block. i love it. The more modern the better as far as I’m concerned. it’s really nice with the different stripe sizes.
Thanks Lisa, I really appreciate your kind words and you stopping by. You could do this block with all sorts of different numbers and sizes of strips – it would be cool.
Such a cool block and I love the quilt! Great job!
Thanks Sharon! Appreciate you coming by to check it out!
This is a great block! I love the mini quilt as well! 🙂
Thanks Amista! Really appreciate you stopping by and your kind words.
The quilt is so pretty. Great tutorial.
Thanks Stephanie! Really appreciate you stopping by.
this is really lovely. i just love how the color placement makes this such a fun block. and the completed quilt is just gorgeous.
Thanks Lori, really appreciate it. The colors we had to work with were really great I think! I love my mini quilt too! 🙂
Love modern improv. Such a great block. I’ll be back tomorrow for the other one.
Thanks Velda! And thanks for coming back tomorrow!
Stunning.I love log cabin patterns and your design is an eyec catching.Grat job!
Thanks Rosa! I love log cabins too, so this was really fun to do.
Yep, I love your quilt and the way that you gave your directions. Tell us, did you use a white board or software – curious minds need to know (especially those of us who want to duplicate). Wonderful work (teacher talking).
Thanks Mary! It is a whiteboard – I bought it at Target for ~$10. I was working so hard to design the block and get it made that figuring out how to get the pattern and tutorial written up on the computer was just beyond me. I just put the pieces on the whiteboard as I constructed the block and wrote notes on the side. I did have some problems however – if you make a mistake, figure it out later and don’t have any more fabric you can’t retake a photo (hence some sloppish editing on a photo tomorrow), and I’m not good enough with photo taking and editing to make the background really crisp and white consistently in all photos. But it was fun, and I learned a lot. I know there is software to do a whiteboard-like effect too – maybe I’ll look that up for next time!
Nice play on the log cabin. 🙂
Thanks Melva! Really appreciate you stopping by.
I really like your block, Ann! It’s such a wonderful new take on the log cabin. I will definitely be back tomorrow to see the next block–thanks for the invite 🙂
Thanks so much Karen. I appreciate your kind words, and stopping back tomorrow!
great block! Using the different colours in different spots gives so many other options. well done!
Thanks Anne! I really wanted to use all of the colors and make them pop out and shine. The colors were all so pretty. Thanks so much for stopping by my blog.
I love this block! So modern
Thanks Suzy, appreciate your kind words and you stopping by.
Love this block Ann – really striking design and great tutorial. What a great mini you’ve produced – I have another block in my head to go with my block on a certain layout. Hasn’t it been so much fun designing and taking part?
Thanks Abigail. It has been fun and I have learned so much. Thanks for stopping by!
I just adore the interplay of the different sizes – it totally pops. Love it!
Thanks Shannon! Appreciate you stopping by. I had fun making the block.
What a gorgeous block, Ann! I audibly gasped when I saw your mini quilt – beautiful work!! And I’m so getting a whiteboard! 😉
Thanks so much Amanda, wow! I don’t think I’ve ever caused a gasp before :). The whiteboard was fun and it made the tutorial pretty easy to do. Good luck with it.
Love the title of your blog! I also peeked at your Chemistry Quilt-the title intrigued me. These blocks are so amazingly different. These Cloud 9 colors are gorgeous together and the individual blocks are awesome. Can’t wait to see the finished quilt!
Thanks Rosemary. My furry kids are the best! Thanks for taking a peak around my blog. Chemistry was fun to do and came together pretty quickly. Yep, I really enjoyed the colors of the Cloud9 fabrics – this was a fun project to do.
I love, love , love this block!
Thanks Sue! Appreciate you stopping by!
These colors are so beautiful. I love how you used so MUCH of the color. Both blocks you designed are perfect together and your mini quilt is GORGEOUS!!
Thanks so much Janice! I did really like all of the colors so I was trying very hard to use all of it. I really didn’t design the blocks to necessarily go together, so it is cool they turned out fitting together so well. Thanks for stopping by.
Sweet!! I love your block design. The mini quilt is pretty awesome too. Well done and fun tutorial
Thanks Dena! Appreciate you stopping by!
What a great block! So easy and so versatile. Love how it looks in a quilt. And that mini is adorable. Great, great job.